-40%
Miniature DOLLHOUSE ASPHALT ROOFING / Birdhouse, School Projects, Kit Buildings
$ 10.56
- Description
- Size Guide
Description
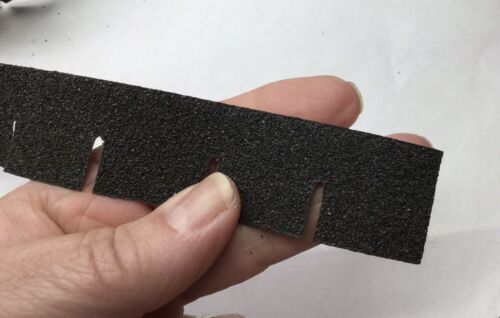
These wonderful asphalt shingles / siding pieces are great for your building projects, crafting needs, kit building, doll house, model railroad, and birdhouse roofing projects. This 8 piece set of 36 inch long strips covers approximately 157 square inches.*Doll House* Bird House* Model Railroad* Archetecture Designs*Shadow Boxes*School Projects
Asphalt Roofing
HOW TO MEASURE YOUR PROJECT:
There are a variety of shingle styles that can be used to shingle a miniature roof to look like a real wood shake or asphalt shingled roof. Once you decide on the style of shingle you wish to use, you must be sure you buy enough shingles to complete your project. To calculate the amount of roofing material you will need, you must first determine the total area of the roof. Typically, packages of shingles are identified by square inches or foot coverage and/or number of shingles. The best figure to identify is square foot coverage.
To calculate the area to be covered, multiply the width by the length of each roof section, and then add these measurements together. That includes the main roof (front and back), the dormers (if present), porch(es), etc. For example, the main roof (front) might measure 24″ wide by 12″ high, which would calculate as 24″ x 12″ = 288 square inches.
The rear roof might be only a partial roof with a band across the top and two small rectangular areas over the side walls. For our hypothetical dollhouse roof, let’s say the top band is 24″ wide by 2″ high, which would calculate at 24″ x 2″ or 48 square inches, and the side rectangles are 2″ wide by 10″ high or 20 square inches each (2″ x 10 ” x 2 = 40). That gives us a rear roof area of 88 square inches.
Our simple little hypothetical miniature building has a front porch that measures 24″ wide by 6″ deep, which would calculate as 24″ x 6″ = 144 square inches.
Again, using our hypothetical miniature building we assume there are two identical dormers on the front roof. In this case you will measure the widest points of each dormer roof section. Let’s say the dormer roofs are 9″ wide (deep) by 5″ high or 9″ x 5″ x 2 (for each side of the dormer) x 2 (for two dormers). These calculations indicate a total dormer area of 180 square inches.
You might think that we are over estimating the areas since the dormer roofs are more triangular than square/rectangular, but it is always better to err on the side of over estimating rather than under estimating. You might also think of the openings in the main roof for the dormers. Let’s just pretend they aren’t there and you have a solid main roof area. Calculating the areas this way provides you a cushion for error. It is possible you might miss cut a shingle (or more) and find you don’t have enough if you under estimated the area to be covered. The second reason it is better to over-estimate is because occasionally a shingle package might contain odd size (too thick, too thin, miss cut) shingles that just won’t work on your project!
Now add up the roof areas to get your total:
Main Roof: 288 square inches
Rear Roof: 88 square inches
Porch Roof: 144 square inches
Dormer Roofs: 180 square inches
Total Roof Area: 700 square inches
To estimate the coverage in square feet, simply divide the total roof area of 700 square inches by 144 (inches in a square foot) for your answer, which in this case is 4.86 square feet. I would round that up to 5 square feet again to be assured that there are enough shingles to cover my roof areas.
***** How to apply asphalt roofing strips *****
You will need sharp scissors, a tacky wood glue (or hot glue gun, but it's not necessary) and a good eye for symmetry. Start by laying the first row upside down flush along the bottom row of your roofing area. Start with the left side of your strip, and cut off any excess. Lay the second row parallel to it and translated up by about half an inch, to line up the top of the tab slot with the top of the previous row. The edge of the shingle strip should line up with the edge of the roof, but likely only for this row. Then, lay the third row staggered over to the left by about half a shingle, lined up the same way, with a small section of the strip overhanging the roof. Cut this section off, trimmed to the roof edge.
Lay the fourth row so that it is lined up with the second row's shingles as exactly as possible, and then the fifth row lined up with the third, and so on.
Optional: For a sturdier roof bond, use staples to secure the strip, on sections which will be covered by the next row.
When nearing the roof peak, cut a strip to meet flush with the edge if necessary. Make sure the opposite side of the roof is finished the same way before continuing.
To cap the roof, cut off single squares, fold them evenly in half, and glue them overlapping the previous shingle by one quarter inch along the roof peak.
For a neat, pressed look to your freshly glued shingles, lay a board over the top and apply weight until the shingles dry.
IF YOU ARE USING THESE OUTDOORS: WE SUGGEST USING WATERPROOF OUTDOOR GLUE OR SILICONE TO MAKE THEM LAST LONGER IN ELEMENTS.... AND USE POLYURETHANE ON TOP FOR EVEN LONGER LASTING PROTECTION.


